


It’s Extra Than Only a Information Switch
When embarking on a Microsoft 365 tenant-to-tenant migration, it’s essential to keep in mind that this course of is greater than only a knowledge switch. It’s akin to shifting into a brand new dwelling: the purpose isn’t just to relocate your belongings, however to create an area that feels acquainted and comfy. For companies, this implies guaranteeing that your digital workspace displays your model id and fosters a way of continuity on your customers.
Acquisitions are a typical state of affairs for a tenant-to-tenant migration: Firm A acquires Firm B and migrates Firm B’s knowledge into Firm A’s tenant. With some acquisitions, companies select to maintain Firm B’s distinct id. In these circumstances, further concerns can enhance the tenant-to-tenant migration expertise.
This text explores sensible steps and scripts to determine cohesive visible branding in a Microsoft 365 tenant, guaranteeing a seamless transition for each your crew and knowledge.
Customizing the Signal-in Expertise
The browser sign-in web page is commonly the primary level for person interplay in a Microsoft 365 surroundings. Customizing the sign-in web page reinforces the id of the surroundings and reassures customers that they’re signing into the proper tenant. The sign-in web page can embrace IT assist data for customers who might have bother logging in.
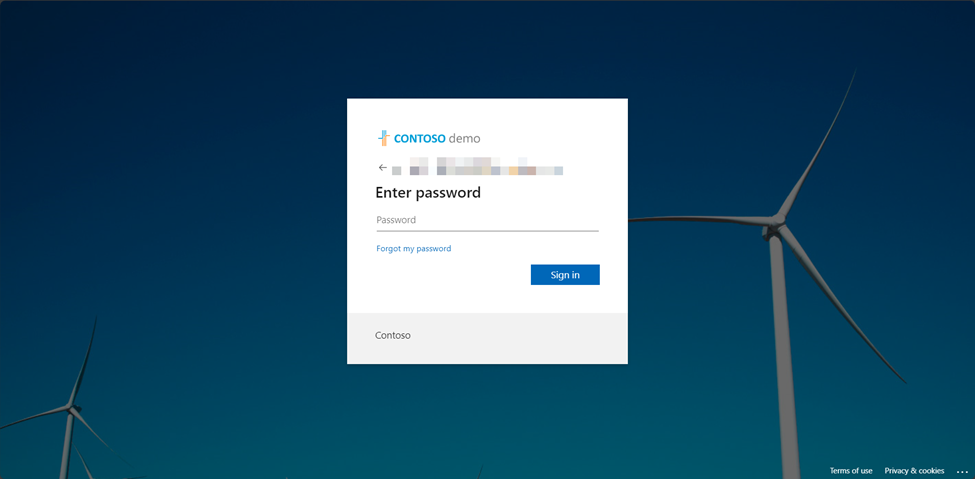
Microsoft paperwork the stipulations so as to add customized branding to a sign-in expertise. Under is a comparability of the default Microsoft 365 sign-in expertise (Determine 1) and a custom-made Microsoft 365 sign-in expertise (Determine 2).
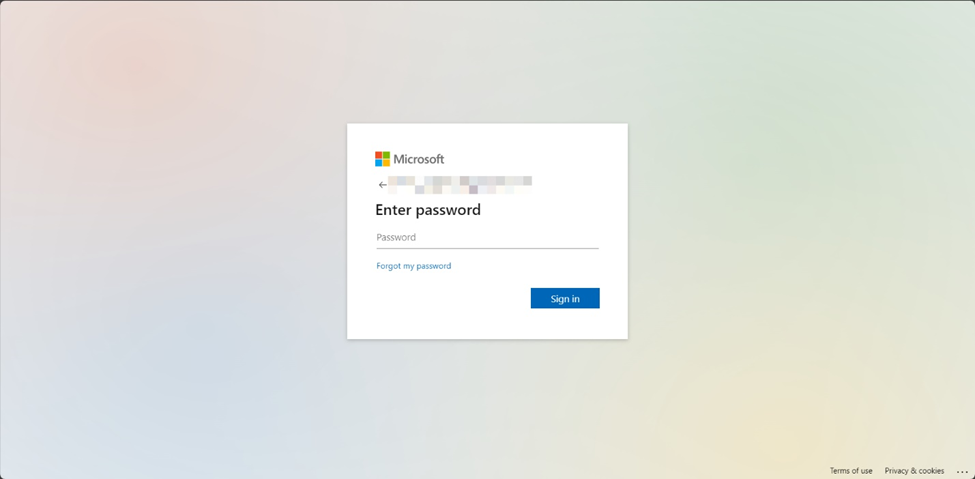
When a person logs into Microsoft 365 utilizing generic hyperlinks (e.g., portal.workplace.com, microsoft365.com), sign-in web page customizations solely seem after the person varieties their e-mail or cellphone quantity and choose the Subsequent button – at which level Entra ID validates the credentials and applies the tenant’s customized branding. Nevertheless, you may drive the branding to seem instantly through the use of the tenant’s verified area title within the URL used to connect with Microsoft 365. The syntax for customized URLs varies throughout functions; right here’s a fast information for some frequent places:
To customise your sign-in expertise, comply with the directions in Microsoft documentation, or use the Microsoft Graph. Let’s see methods to customise the sign-in expertise with the Graph SDK.
Customise Firm Branding with PowerShell
After confirming that the stipulations for customized firm branding are in place, connect with Microsoft Graph utilizing the PowerShell SDK.
# Set the Tenant ID
$tenantID = “74282c8c-971c-48b1-bce2-a58aff66cf5a”

# Connect with Microsoft Graph
Join-MgGraph -TenantId $tenantId -Scopes "Group.ReadWrite.All"
As a result of default values exist, the string properties used for branding may be up to date by working a PATCH command by way of the Invoke-MgGraphRequest cmdlet. Picture properties have to be up to date one after the other, utilizing PUT instructions. You possibly can configure any of the organizationalBranding properties supported for branding. Right here’s an instance of setting values for string properties after which updating the tenant configuration with Invoke-MgGraphRequest:
# Web page background coloration. Replaces the sign-in web page picture if it can not load
$backgroundColor = "#FF99CC"

# Textual content on the backside of the sign-in field. For more information e.g., assist desk cellphone quantity. Unicode, max 1024 characters
$signInPageText = "Welcome to Contoso. IT Helpdesk: 555-5555 ext. 55."

# Configure format. “default” = Default format with centered lightbox. “verticalSplit” = Background on left and full-height lightbox on proper
$layoutTemplateType = "verticalSplit"
$isHeaderShown = $false
$isFooterShown = $false

# Configure login web page textual content visibility settings
$hidePrivacyAndCookies = $false
$hideTermsOfUse = $false

# Set to $true to cover all SSPR hyperlinks
$hideAccountResetCredentials = $true

# Individually cover SSPR hyperlinks. hideAccountResetCredentials have to be set to $false
$hideCannotAccessYourAccount = $true
$hideForgotMyPassword = $true
$hideResetItNow = $true

# Put together the request physique for non-image properties
$physique = @{
    backgroundColor = $backgroundColor
    signInPageText = $signInPageText
    loginPageTextVisibilitySettings = @{
        hideAccountResetCredentials = $hideAccountResetCredentials
        hideCannotAccessYourAccount = $hideCannotAccessYourAccount
        hideForgotMyPassword = $hideForgotMyPassword
        hidePrivacyAndCookies = $hidePrivacyAndCookies
        hideResetItNow = $hideResetItNow
        hideTermsOfUse = $hideTermsOfUse
    }
    loginPageLayoutConfiguration = @{
        layoutTemplateType = $layoutTemplateType
        isHeaderShown = $isHeaderShown
        isFooterShown = $isFooterShown
    }
} | ConvertTo-Json

# Concern request to Graph API
Invoke-MgGraphRequest -Methodology PATCH -Uri "https://graph.microsoft.com/v1.0/group/$($tenantID)/branding" -Physique $physique -ContentType "software/json"
Right here’s methods to configure the photographs used for tenant branding:
# Set the content material kind
$contentType = "picture/*"

# Banner firm emblem. PNG or JPEG picture, 36x245px. Suggest clear picture with no padding
$bannerLogoPath = "C:/Customers/kariska/Downloads/Image36x245.png"
$bannerLogoEndpoint = “https://graph.microsoft.com/v1.0/group/$tenantID/branding/localizations/0/bannerLogo”

# Background picture of sign-in web page. PNG or JPEG picture, 1920x1080px, max file measurement 300KB
$backgroundImagePath = "C:/Customers/kariska/Downloads/Image1920x1080.png"
$backgroundImageEndpoint = “https://graph.microsoft.com/v1.0/group/$tenantID/branding/localizations/0/backgroundImage”

# Favicon. PNG (most well-liked) or JPEG picture, 32x32px, max file measurement 5KB
$faviconPath = "C:/Customers/kariska/Downloads/Image36x36.png"
$faviconEndpoint = “https://graph.microsoft.com/v1.0/group/$tenantID/branding/localizations/0/favicon”

# Concern requests to Graph API
Invoke-MgGraphRequest -Methodology PUT -Uri $bannerLogoEndpoint -InputFilePath $bannerLogoPath -ContentType $contentType

Invoke-MgGraphRequest -Methodology PUT -Uri $backgroundImageEndpoint -InputFilePath $backgroundImagePath -ContentType $contentType

Invoke-MgGraphRequest -Methodology PUT -Uri $faviconEndpoint -InputFilePath $faviconPath -ContentType $contentType
Don’t neglect to disconnect from Graph:
Disconnect-MgGraph
Branding the Microsoft 365 Suite Header
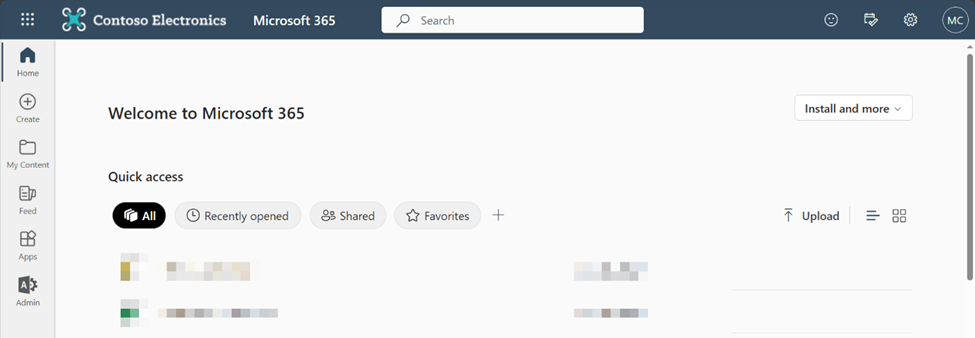
A constant theme reinforces organizational id throughout Microsoft 365. What Microsoft refers to because the “Group theme” is solely the colours and emblem within the Microsoft 365 suite header. This header, pictured beneath, persists in browser-based apps in Microsoft 365.
Tenants can have a number of group themes: a default theme that applies to everybody within the org, and as much as 4 further themes. Extra themes are assigned to a number of Microsoft 365 teams (sorry, no safety teams or distribution teams). For acquisitions, take into account creating an extra theme for migrated customers. Offered you meet the stipulations, create a dynamic Microsoft 365 group primarily based on properties like companyName.
Microsoft’s documentation supplies easy directions on methods to customise the default theme and methods to create further themes. Right now, a tenant’s group theme can’t be configured utilizing scripts.
SharePoint On-line Branding
SharePoint websites are central to collaboration and must also mirror an organization’s visible id. We will reinforce that id within the theme, header, navigation, and footer of SharePoint websites. This weblog submit covers the fundamentals of fixing the look of your web site, together with including a web site emblem; this submit teaches you methods to create and deploy a customized coloration theme.
In case your migration is an acquisition and the supply websites should not already architected in a hub construction, making a branded hub web site for the acquired firm with their migrated websites joined to it’ll assist migrated customers navigate to their data extra simply, and assist current customers to find out which knowledge pertains to the migrated firm.
These scripts require the SharePoint On-line Administration Shell and PnP PowerShell.
Export a SharePoint Shade Theme from a Supply Tenant and Create it in a Goal Tenant
This script makes use of the SharePoint On-line Administration Shell to get the properties of a theme in a supply tenant after which creates a brand new theme within the goal tenant with these properties:
# Admin URLs for supply and goal
$sourceAdminUrl = “https://skapski-admin.sharepoint.com”
$targetAdminUrl = “https://m365x18891260-admin.sharepoint.com”

# Identify of the theme to export
$themeName = “Customized Cyan”

# Connect with supply with a SharePoint Administrator account
Join-SPOService -Url $sourceAdminUrl

# Get theme settings
$Palette = Get-SPOTheme -Identify $themeName | Choose-Object -ExpandProperty Palette
$IsInverted = Get-SPOTheme -Identify $themeName | Choose-Object -ExpandProperty IsInverted

# Join to focus on with a SharePoint Administrator account
Join-SPOService -Url $targetAdminUrl

# Add the colour theme to the goal tenant
Add-SPOTheme -Identification $themeName -Palette $palette -IsInverted $isinverted

Write-Host "Added $themeName theme to focus on tenant”
Apply a Shade Theme to a Listing of Websites
This script applies a SharePoint coloration theme to a listing of web sites utilizing the knowledge contained in a siteURL column in a CSV:
# File path of CSV
$csvPath = "C:/Customers/kariska/Paperwork/Websites.csv"

Import-Csv $csvPath | ForEach-Object {
    $siteURL = $_.SiteURL

    # Apply the theme to the positioning
    Set-SPOWebTheme -Identification $ThemeName -Internet $siteUrl

    Write-Host "Utilized $themeName theme to $siteUrl"
}
Designate a Hub Website, Affiliate Websites to the Hub, and Add Related Websites to the Hub Website Navigation
Add a column to your CSV and title it “HubStatus”. Select one web site to designate because the hub by writing “Hub” beside it, within the HubStatus column. Go away all of the others clean.
# Connect with PnP PowerShell
Join-PnPOnline tenant.sharepoint.com -Interactive

# File path of CSV
$csvPath = "C:/Customers/kariska/Paperwork/Websites.csv"

# SharePoint Admin person account
$adminUser = “[email protected]”

Import-Csv $csvPath | ForEach-Object {
    $siteUrl = $_.SiteUrl
    $hubStatus = $_.HubStatus
    # Register hub web site and grant the SharePoint Admin rights to the hub web site
    if ($hubStatus -eq "Hub") {
        $hubSiteURL = $siteURL
        Register-PnPHubSite -Website $hubSiteURL -Principals  $adminUser
        Write-Host "Registered $hubSiteURL as Hub Website"
    }
    # Affiliate different websites to hub and add them to hub navigation
    elseif ($hubStatus -ne $Hub -and $siteURL -ne $null) {
        Add-PnPHubSiteAssociation -Website $siteURL -HubSite $hubSiteURL
        Join-PnPOnline -Url $siteURL -Interactive
        $net = Get-PnPWeb
        $siteTitle = Get-PnPProperty -ClientObject $net -Property Title
        Join-PnPOnline -Url $hubSiteURL -Interactive
        Add-PnPNavigationNode -Title $siteTitle -Url $siteURL -Location "TopNavigationBar"
        Write-Host "Related $siteURL with Hub Website"
    }
}
As a result of caching, you could have to browse to the hub web site, click on Edit on the hub web site navigation, after which click on Save to make modifications seen.
Add a Customized Tile to the App Launcher
The Microsoft 365 app launcher accommodates the apps and companies that you’re licensed for. With a little bit of configuration, the app launcher can embrace customized tiles. These may help customers extra simply navigate to shared sources – for instance, a hub web site in SharePoint On-line. Under is a simplified picture of the app launcher menu:
Add a customized tile to the app launcher by navigating to https://admin.microsoft.com > Settings > Org settings > Group profile. Click on “Customized tiles for apps”, click on “Add a customized tile”, and enter the next data:
| Area | Description |
| Tile title | Tile title. Seems within the tile. |
| URL of web site | What opens when customers click on the tile. |
| URL of tile picture | The picture must be 60×60 pixels and be accessible to everybody in your group with out requiring authentication. Use HTTPS within the URL. Seems on the My Apps web page and the app launcher. |
| Description | Description of the tile. Seen when you choose the tile on the My Apps web page and choose App Particulars. |
You can also make the customized app tile extra seen by pinning it for customers.
It’s Time to Refresh and Reinforce
Microsoft 365 tenant-to-tenant migration supplies a possibility to strengthen and refresh your model id throughout digital workspaces. By customizing sign-in pages, SharePoint websites, including customized tiles to the Microsoft 365 app launcher, and sustaining distinct branding for subsidiaries, you create an surroundings that’s welcoming and acquainted to your customers.
Bear in mind, migration isn’t nearly shifting knowledge; it’s about creating an area the place your crew can thrive.


+ There are no comments
Add yours