


Put up Views: 988
On this put up, you’ll come to know how one can combine third events with Dataverse utilizing completely different eventualities.
This part will clarify how you should use no code method to combine third occasion apps from Dataverse. You need to use under No-code Much less-code method of integration.
Dataverse Integration with Microsoft 365 Native Apps. For Native apps integration you should use configurations obtainable.
- Outlook integration Dataverse Watch Right here
- SharePoint Integration Dataverse Learn Right here
- OneDrive Integration Learn Right here
- OneNote Integration Learn Right here
The under are the methods by which Dataverse can work together with Third Events
- Digital Tables
- Energy Automate
- Net Hooks
- Service Finish Factors
- Logic Apps
- Utilizing JavaScript
- Utilizing jQuery
- Utilizing C#, Plugins
- Twin Write
The under are the methods by which third events can work together with Dataverse
- Customized APIs
- Energy Automate API
- Dataverse API
- Logic Apps
- Utilizing JavaScript
- Utilizing jQuery
- Utilizing C#
Scematic Diagram.
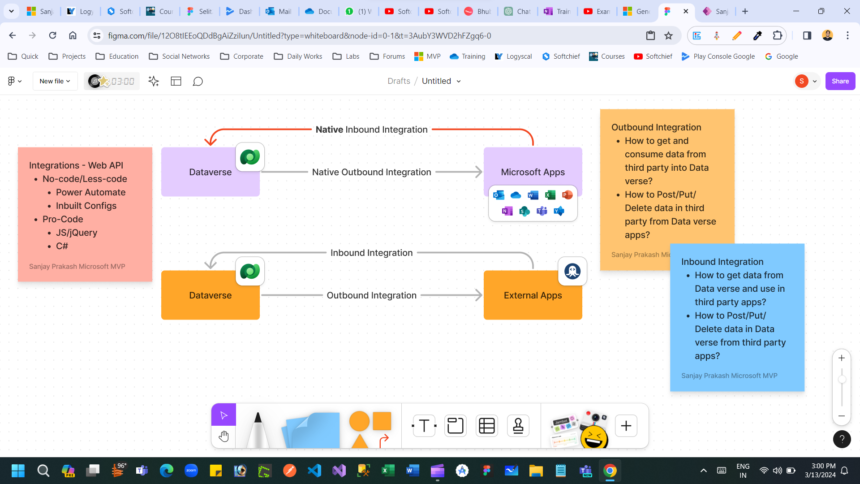
Lets us perceive every integrations.
1. Digital Desk – Dataverse can work together with Third Events
A “Digital Desk” within the context of Dataverse usually refers to a method to combine information from exterior sources into your Dataverse setting with out bodily storing that information in your tables. It means that you can create a desk in Dataverse that’s linked to an exterior information supply, corresponding to a database, net service, or API.
If you say “work together with third events,” it signifies that you should use Digital Tables to attach Dataverse with exterior techniques or providers offered by third-party distributors. This could embrace pulling information from these third-party sources into Dataverse, pushing information from Dataverse to those sources, and even performing real-time interactions and transactions.
For instance, you would possibly use Digital Tables to:
- Import information: Pull information from an exterior CRM system into Dataverse to mix it along with your present information for reporting and evaluation.
- Export information: Push information from Dataverse to an exterior accounting system for processing invoices or producing monetary studies.
- Actual-time interactions: Join Dataverse with a cost gateway to course of transactions immediately inside your utility.
Here’s a video the place you’re going to get to find out about how one can configure Digital Tables. Study extra right here https://be taught.microsoft.com/en-us/dynamics365/customerengagement/on-premises/customise/create-edit-virtual-entities?view=op-9-1
You need to use superior settings for extra digital desk integrrations utilizing adapters.
2. Energy Automate – Dataverse can work together with Third Events
Energy Automate, previously generally known as Microsoft Stream, is a robust device for automating workflows throughout varied functions and providers. Dataverse, previously generally known as the Frequent Information Service (CDS), is a Microsoft Azure-based information storage answer. It means that you can securely retailer and handle information that’s utilized by enterprise functions.
Relating to interacting with third-party providers or functions utilizing Energy Automate and Dataverse, it will depend on the particular necessities and capabilities. Listed here are some normal methods how this interplay could be achieved:
- Connectors: Energy Automate affords a variety of connectors that can help you combine with third-party providers. These connectors facilitate communication between Energy Automate and exterior techniques. Whereas some connectors are particularly designed for Microsoft services, there are numerous connectors obtainable for well-liked third-party providers corresponding to Google Drive, Salesforce, Twitter, and extra.
- Customized Connectors: If there isn’t a pre-built connector obtainable for the third-party service you wish to work together with, you possibly can create customized connectors utilizing Energy Automate or Azure Logic Apps. Customized connectors can help you lengthen the capabilities of Energy Automate and combine with just about any RESTful API.
- HTTP Requests: Energy Automate lets you make HTTP requests immediately, permitting you to work together with RESTful APIs of third-party providers. This method gives flexibility however requires extra technical information in comparison with utilizing pre-built connectors.
- Dataverse Integrations: Dataverse itself could be built-in with third-party providers utilizing Energy Automate. For instance, you possibly can set off workflows in Energy Automate primarily based on adjustments or occasions in Dataverse entities. This lets you automate processes that contain Dataverse information and exterior techniques.
- Azure Providers: Since Dataverse is a part of the Microsoft Energy Platform, which is tightly built-in with Azure providers, you possibly can leverage Azure providers corresponding to Azure Capabilities, Azure Logic Apps, and Azure Occasion Grid for extra complicated integrations with third-party providers.
By leveraging these capabilities, you possibly can create highly effective workflows that automate processes and allow seamless interactions between Dataverse and third-party providers throughout the Energy Automate ecosystem.
Here’s a video which is able to assist you to know how one can name third occasion APIs utilizing Energy Automate HTTP connectors.
3. Net Hooks- Dataverse can work together with Third Events
Sure, webhooks are a typical methodology for techniques like Dataverse to work together with third-party functions. Webhooks are basically user-defined HTTP callbacks which might be triggered by particular occasions within the supply utility, such because the creation or modification of data in Dataverse.
Right here’s the way it usually works:
- Configuration: Customers configure webhooks inside Dataverse, specifying the occasions they wish to set off the webhook and offering the endpoint URL of the third-party utility.
- Occasion Set off: When the required occasion happens in Dataverse (e.g., a brand new file is created), Dataverse sends an HTTP POST request to the webhook’s endpoint URL.
- Information Payload: The HTTP POST request usually contains related information concerning the occasion that triggered the webhook. This information might embrace details about the file that was created or modified.
- Third-Social gathering Processing: The third-party utility receives the webhook request and processes the info as wanted. This might contain performing extra actions primarily based on the obtained information or updating its personal database.
Through the use of webhooks, Dataverse can combine with a variety of third-party functions and providers, enabling automation and synchronization between completely different techniques.
Here’s a video explaining how Webhook works.
4. Service Finish Level- Dataverse can work together with Third Events
It’s also possible to combine third events from Dataverse utilizing Service Finish Factors. Here’s a video which is able to clarify you the method of utilizing exterior service endpoints from Dataverse.
5. Logic App – Dataverse can work together with Third Events
Sure, Logic Apps can work together with Dataverse in addition to third-party providers. Microsoft Energy Automate, which incorporates Logic Apps, has connectors for Dataverse (previously generally known as Frequent Information Service) that can help you set off workflows primarily based on adjustments to Dataverse information or to control Dataverse data.
Moreover, Logic Apps assist a variety of connectors for interacting with third-party providers corresponding to Microsoft 365, Salesforce, Google providers, social media platforms, databases, and lots of others. These connectors allow you to combine Dataverse with different techniques and automate processes throughout your group.
By leveraging Logic Apps, you possibly can construct workflows that join Dataverse with third-party providers, permitting you to streamline enterprise processes, automate duties, and enhance general effectivity.
Here’s a video which is able to assist you to know the way it works.
6. JavaScript – Dataverse can work together with Third Events
Utilizing JavaScript, you possibly can name exterior APIs for information integration and devour information in Dataverse from exterior events.
Here’s a pattern code which is able to assist you to know how one can name exterior webapi from JavaScript.
const information = null;

const xhr = new XMLHttpRequest();
xhr.withCredentials = true;

xhr.addEventListener('readystatechange', perform () {
	if (this.readyState === this.DONE) {
		console.log(this.responseText);
	}
});

xhr.open('GET', 'https://jsearch.p.rapidapi.com/search?question=Pythonpercent20developerpercent20inpercent20Texaspercent2Cpercent20USA&web page=1&num_pages=1');
xhr.setRequestHeader('X-RapidAPI-Key', 'af363b6493mshdfe9e5baf0d95b4p1050afjsnbba51b538f8c232');
xhr.setRequestHeader('X-RapidAPI-Host', 'jsearch.p.rapidapi.com');

xhr.ship(information);
JavaScript
7. jQuery – Dataverse can work together with Third Events
Utilizing jQuery, you possibly can name exterior APIs for information integration and devour information in Dataverse from exterior events.
Here’s a pattern code which is able to assist you to know how one can name exterior webapi from jQuery.
const settings = {
	async: true,
	crossDomain: true,
	url: 'https://jsearch.p.rapidapi.com/search?question=Pythonpercent20developerpercent20inpercent20Texaspercent2Cpercent20USA&web page=1&num_pages=1',
	methodology: 'GET',
	headers: {
		'X-RapidAPI-Key': 'af363b6493mshdfe9e5baf0d95b4p1050afjsnbba51b538f8c23',
		'X-RapidAPI-Host': 'jsearch.p.rapidapi.com'
	}
};

$.ajax(settings).completed(perform (response) {
	console.log(response);
});
JavaScript
8. Utilizing C# – Plugins, Console, Customized WF – Dataverse can work together with Third Events
You need to use C# code to name exterior APIs.
Right here is pattern code.
utilizing System.Internet.Http.Headers;
var shopper = new HttpClient();
var request = new HttpRequestMessage
{
	Technique = HttpMethod.Get,
	RequestUri = new Uri("https://jsearch.p.rapidapi.com/search?question=Pythonpercent20developerpercent20inpercent20Texaspercent2Cpercent20USA&web page=1&num_pages=1"),
	Headers =
	{
		{ "X-RapidAPI-Key", "af363b6493mshdfe9e5baf0d95b4p1050afjsnbba51b538f8c23" },
		{ "X-RapidAPI-Host", "jsearch.p.rapidapi.com" },
	},
};
utilizing (var response = await shopper.SendAsync(request))
{
	response.EnsureSuccessStatusCode();
	var physique = await response.Content material.ReadAsStringAsync();
	Console.WriteLine(physique);
}
C#
9. Twin Write – Dataverse Integration with Different ERPs
Twin write permits for real-time or near-real-time synchronization of knowledge adjustments between two techniques, guaranteeing consistency and integrity throughout each environments.
Right here’s how the method of twin write usually works:
- Information Mapping: First, you determine the info entities and fields that should be synchronized between the 2 techniques. You map these entities and fields to make sure that information is appropriately transferred between them.
- Change Detection: Twin write techniques repeatedly monitor adjustments in information in each supply and goal techniques. This includes detecting insertions, updates, and deletions to maintain each techniques in sync.
- Information Transformation: Information would possibly should be remodeled to match the format or construction required by the goal system. This step ensures that information is suitable and usable in each environments.
- Synchronization: When adjustments are detected within the supply system, the twin write mechanism ensures that these adjustments are propagated to the goal system in real-time or near-real-time. This synchronization course of maintains information consistency throughout each techniques.
- Battle Decision: In circumstances the place conflicts come up as a consequence of simultaneous adjustments in each techniques, battle decision mechanisms are employed to make sure information integrity. Methods for battle decision might range relying on the particular necessities of the mixing.
- Error Dealing with and Logging: Twin write techniques usually embrace error dealing with mechanisms to cope with points corresponding to community failures, information validation errors, or system downtime. Logging mechanisms file synchronization actions for auditing and troubleshooting functions.
Total, twin write facilitates seamless information integration and synchronization between disparate techniques, enabling organizations to take care of constant and up-to-date information throughout their IT panorama.
The under are the methods by which third events can work together with Dataverse.
1. Customized API – Calling Dataverse Customized APIs from Exterior App
dhere to straightforward HTTP strategies like GET, POST, PUT, DELETE, and so on., and so they work over HTTP or HTTPS.
Right here’s a normal information on how one can name a Dataverse Customized API from an exterior utility:
- Perceive the Customized API Endpoint: You might want to know the endpoint URL of the Customized API you wish to name. This usually seems like
https://<your-dataverse-url>/api/information/v<model>/[entity_name]/[action_name], the place<your-dataverse-url>is your Dataverse occasion URL,<model>is the model of the Dataverse API you’re utilizing,[entity_name]is the title of the entity (e.g., desk) you’re working with, and[action_name]is the title of the motion (e.g., perform) you wish to invoke. - Authentication: Dataverse normally requires authentication to entry its APIs. You would possibly must get hold of an entry token or use another authentication methodology relying in your Dataverse occasion setup. Frequent strategies embrace OAuth 2.0 or Azure Lively Listing (Azure AD) authentication.
- HTTP Request: Make an HTTP request to the Customized API endpoint utilizing your most well-liked programming language or device. You’ll usually use libraries or instruments that may make HTTP requests, corresponding to
requestsin Python,HttpClientin .NET,fetchAPI in JavaScript,curlcommand-line device, or another related device. - Deal with Responses: Deal with the responses returned by the Customized API. This contains dealing with HTTP standing codes, parsing response our bodies (normally in JSON format), and coping with any errors or exceptions.
Right here’s a easy instance utilizing Python and the requests library:
// Substitute these variables along with your precise values
const dataverseUrl = 'https://your-dataverse-url';
const apiVersion = '9.1';  // Or whichever model you might be utilizing
const entityName = 'accounts';
const actionName = 'YourCustomAction'; //API Title
const accessToken = 'your-access-token';

// Assemble the API endpoint URL
const endpointUrl = `${dataverseUrl}/api/information/v${apiVersion}/${entityName}/${actionName}`;

// Create a brand new XMLHttpRequest object
const xhr = new XMLHttpRequest();

// Arrange the request
xhr.open('GET', endpointUrl, true);
xhr.setRequestHeader('Authorization', `Bearer ${accessToken}`);
xhr.setRequestHeader('Content material-Sort', 'utility/json');

// Outline a perform to deal with the response
xhr.onload = perform() {
  if (xhr.standing >= 200 && xhr.standing < 300) {
    // Success standing code
    const responseData = JSON.parse(xhr.responseText);
    console.log(responseData);  // Deal with the response information right here
  } else {
    // Error standing code
    console.error('Request failed with standing:', xhr.standing, xhr.statusText);
  }
};

// Outline a perform to deal with errors
xhr.onerror = perform() {
  console.error('Request failed');
};

// Ship the request
xhr.ship();
JavaScript
To get Entry token you should use under code
// Substitute these variables along with your precise values
const tenant = 'your-tenant-id-or-domain';
const clientId = 'your-client-id';
const clientSecret = 'your-client-secret';
const scope = 'https://your-dataverse-instance-url/.default'; // Assuming .default is the scope for Dataverse API entry

// Azure AD token endpoint
const tokenEndpoint = `https://login.microsoftonline.com/${tenant}/oauth2/v2.0/token`;

// Create a brand new XMLHttpRequest object
const xhr = new XMLHttpRequest();

// Arrange the request
xhr.open('POST', tokenEndpoint, true);
xhr.setRequestHeader('Content material-Sort', 'utility/x-www-form-urlencoded');

// Outline a perform to deal with the response
xhr.onload = perform() {
  if (xhr.standing >= 200 && xhr.standing < 300) {
    // Success standing code
    const responseData = JSON.parse(xhr.responseText);
    const accessToken = responseData.access_token;

    // Now that you've the entry token, you should use it to make requests to the Dataverse API
    // Embody the code to make Dataverse API calls right here
  } else {
    // Error standing code
    console.error('Token request failed with standing:', xhr.standing, xhr.statusText);
  }
};

// Outline a perform to deal with errors
xhr.onerror = perform() {
  console.error('Token request failed');
};

// Assemble the request physique
const requestBody = `grant_type=client_credentials&client_id=${encodeURIComponent(clientId)}&client_secret=${encodeURIComponent(clientSecret)}&scope=${encodeURIComponent(scope)}`;

// Ship the request
xhr.ship(requestBody);
JavaScript
To get Shopper ID, Shopper Secret you possibly can register app in Lively Listing Learn this to know how one can generate this IDs.
2. Energy Automate API – Calling Dataverse from Exterior App
You need to use Energy Automate as an Net API from exterior apps and name it utilizing JS, jQuery or Server facet code. Watch the belo video to be taught extra.
3. Dataverse API – Calling Dataverse from Exterior Apps
Dataverse gives an Net API finish level that you should use in your exterior utility to name the API to work together with Dataverse information. Under pattern code to attach Dataverse API.
To connect with the Dataverse Net API from an exterior utility utilizing JavaScript, you should use the Fetch API or XMLHttpRequest as proven earlier. Under, I’ll give you an instance of how one can authenticate and make a request to the Dataverse Net API utilizing the Fetch API with Azure AD authentication.
Assuming you’ve registered an utility in Azure Lively Listing and configured the required permissions for accessing Dataverse. To get Shopper ID, Shopper Secret you possibly can register app in Lively Listing Learn this to know how one can generate this IDs.
Use ADAL for authentication.
Right here is pattern code.
<!DOCTYPE html>
<html>
<head>
    <title>Easy SPA</title>
    <meta charset="utf-8" />
    <script src="https://safe.aadcdn.microsoftonline-p.com/lib/1.0.17/js/adal.min.js"></script>
    <script kind="textual content/javascript">

        "use strict";

        //Set these variables to match your setting
        var organizationURI = "https://devboxsoftchief.api.crm8.dynamics.com"; //The URL of your Frequent Information Service group
        var tenant = "3be0e278-57d8-431f-aefa-459cd7449ebc"; //The title of the Azure AD group you utilize
        var clientId = "8edd889b-2a70-46c0-a161-0e4ce4ee9f2d"; //The ClientId you bought whenever you registered the appliance
        var pageUrl = "https://localhost:44396/Check.html"; //The URL of this web page in your improvement setting when debugging.

        var consumer, authContext, message, errorMessage, loginButton, logoutButton, getAccountsButton, accountsTable, accountsTableBody;

        //Configuration information for AuthenticationContext
        var endpoints = {
            orgUri: organizationURI
        };

        window.config = {
            tenant: tenant,
            clientId: clientId,
            postLogoutRedirectUri: pageUrl,
            endpoints: endpoints,
            cacheLocation: 'localStorage',
        };

        doc.onreadystatechange = perform () {
            if (doc.readyState == "full") {

                //Set DOM parts referenced by scripts
                message = doc.getElementById("message");
                errorMessage = doc.getElementById("errorMessage");
                loginButton = doc.getElementById("login");
                logoutButton = doc.getElementById("logout");
                getAccountsButton = doc.getElementById("getAccounts");
                accountsTable = doc.getElementById("accountsTable");
                accountsTableBody = doc.getElementById("accountsTableBody");

                //Occasion handlers on DOM parts
                loginButton.addEventListener("click on", login);
                logoutButton.addEventListener("click on", logout);
                getAccountsButton.addEventListener("click on", getAccounts);

                //name authentication perform
                authenticate();

                if (consumer) {
                    loginButton.type.show = "none";
                    logoutButton.type.show = "block";
                    getAccountsButton.type.show = "block";

                    var helloMessage = doc.createElement("p");
                    helloMessage.textContent = "Whats up " + consumer.profile.title;
                    message.appendChild(helloMessage)

                }
                else {
                    loginButton.type.show = "block";
                    logoutButton.type.show = "none";
                    getAccountsButton.type.show = "none";
                }

            }
        }

        // Perform that manages authentication
        perform authenticate() {
            //OAuth context
            authContext = new AuthenticationContext(config);

            // Test For & Deal with Redirect From AAD After Login
            var isCallback = authContext.isCallback(window.location.hash);
            if (isCallback) {
                authContext.handleWindowCallback();
            }
            var loginError = authContext.getLoginError();

            if (isCallback && !loginError) {
                window.location = authContext._getItem(authContext.CONSTANTS.STORAGE.LOGIN_REQUEST);
            }
            else {
                errorMessage.textContent = loginError;
            }
            consumer = authContext.getCachedUser();

        }

        //perform that logs within the consumer
        perform login() {
            authContext.login();
        }
        //perform that logs out the consumer
        perform logout() {
            authContext.logOut();
            accountsTable.type.show = "none";
            accountsTableBody.innerHTML = "";
        }

        //perform that initiates retrieval of accounts
        perform getAccounts() {

            getAccountsButton.disabled = true;
            var retrievingAccountsMessage = doc.createElement("p");
            retrievingAccountsMessage.textContent = "Retrieving 10 accounts from " + organizationURI + "/api/information/v9.1/accounts";
            message.appendChild(retrievingAccountsMessage)

            // Perform to carry out operation is handed as a parameter to the acquireToken methodology
            authContext.acquireToken(organizationURI, retrieveAccounts)

        }

        //Perform that really retrieves the accounts
        perform retrieveAccounts(error, token) {
            // Deal with ADAL Errors.
            if (error || !token) {
                errorMessage.textContent = 'ADAL error occurred: ' + error;
                return;
            }

            var req = new XMLHttpRequest()
            req.open("GET", encodeURI(organizationURI + "/api/information/v9.1/accounts?$choose=title,address1_city&$high=10"), true);
            //Set Bearer token
            req.setRequestHeader("Authorization", "Bearer " + token);
            req.setRequestHeader("Settle for", "utility/json");
            req.setRequestHeader("Content material-Sort", "utility/json; charset=utf-8");
            req.setRequestHeader("OData-MaxVersion", "4.0");
            req.setRequestHeader("OData-Model", "4.0");
            req.onreadystatechange = perform () {
                if (this.readyState == 4 /* full */) {
                    req.onreadystatechange = null;
                    if (this.standing == 200) {
                        var accounts = JSON.parse(this.response).worth;
                        renderAccounts(accounts);
                    }
                    else {
                        var error = JSON.parse(this.response).error;
                        console.log(error.message);
                        errorMessage.textContent = error.message;
                    }
                }
            };
            req.ship();
        }
        //Perform that writes account information to the accountsTable
        perform renderAccounts(accounts) {
            accounts.forEach(perform (account) {
                var title = account.title;
                var metropolis = account.address1_city;
                var nameCell = doc.createElement("td");
                nameCell.textContent = title;
                var cityCell = doc.createElement("td");
                cityCell.textContent = metropolis;
                var row = doc.createElement("tr");
                row.appendChild(nameCell);
                row.appendChild(cityCell);
                accountsTableBody.appendChild(row);
            });
            accountsTable.type.show = "block";
        }

    </script>
    <type>
        physique {
            font-family: 'Segoe UI';
        }

        desk {
            border-collapse: collapse;
        }

        td, th {
            border: 1px stable black;
        }

        #errorMessage {
            colour: crimson;
        }

        #message {
            colour: inexperienced;
        }
    </type>
</head>
<physique>
    <button id="login">Login</button>
    <button id="logout" type="show:none;">Logout</button>
    <button id="getAccounts" type="show:none;">Get Accounts</button>
    <div id="errorMessage"></div>
    <div id="message"></div>
    <desk id="accountsTable" type="show:none;">
        <thead><tr><th>Title</th><th>Metropolis</th></tr></thead>
        <tbody id="accountsTableBody"></tbody>
    </desk>
</physique>
</html>
HTML
4. Logic Apps – Calling Dataverse from Exterior App
Utilizing Logic App you should use connectors to conenct any utility on the earth. YOu can test if the connector is on the market or not in right here. If connector just isn’t obtainable however the app has a Net API then you possibly can create a customized connector to conenct it or use HTTP actions to attach.
Watch under video to learn the way logic app works.
5. JavaScript – Calling Dataverse from Exterior App
Use under javascript to name Dataverse.
<!DOCTYPE html>
<html>
<head>
    <title>Easy SPA</title>
    <meta charset="utf-8" />
    <script src="https://safe.aadcdn.microsoftonline-p.com/lib/1.0.17/js/adal.min.js"></script>
    <script kind="textual content/javascript">

        "use strict";

        //Set these variables to match your setting
        var organizationURI = "https://devboxsoftchief.api.crm8.dynamics.com"; //The URL of your Frequent Information Service group
        var tenant = "3be0e278-57d8-431f-aefa-459cd7449ebc"; //The title of the Azure AD group you utilize
        var clientId = "8edd889b-2a70-46c0-a161-0e4ce4ee9f2d"; //The ClientId you bought whenever you registered the appliance
        var pageUrl = "https://localhost:44396/Check.html"; //The URL of this web page in your improvement setting when debugging.

        var consumer, authContext, message, errorMessage, loginButton, logoutButton, getAccountsButton, accountsTable, accountsTableBody;

        //Configuration information for AuthenticationContext
        var endpoints = {
            orgUri: organizationURI
        };

        window.config = {
            tenant: tenant,
            clientId: clientId,
            postLogoutRedirectUri: pageUrl,
            endpoints: endpoints,
            cacheLocation: 'localStorage',
        };

        doc.onreadystatechange = perform () {
            if (doc.readyState == "full") {

                //Set DOM parts referenced by scripts
                message = doc.getElementById("message");
                errorMessage = doc.getElementById("errorMessage");
                loginButton = doc.getElementById("login");
                logoutButton = doc.getElementById("logout");
                getAccountsButton = doc.getElementById("getAccounts");
                accountsTable = doc.getElementById("accountsTable");
                accountsTableBody = doc.getElementById("accountsTableBody");

                //Occasion handlers on DOM parts
                loginButton.addEventListener("click on", login);
                logoutButton.addEventListener("click on", logout);
                getAccountsButton.addEventListener("click on", getAccounts);

                //name authentication perform
                authenticate();

                if (consumer) {
                    loginButton.type.show = "none";
                    logoutButton.type.show = "block";
                    getAccountsButton.type.show = "block";

                    var helloMessage = doc.createElement("p");
                    helloMessage.textContent = "Whats up " + consumer.profile.title;
                    message.appendChild(helloMessage)

                }
                else {
                    loginButton.type.show = "block";
                    logoutButton.type.show = "none";
                    getAccountsButton.type.show = "none";
                }

            }
        }

        // Perform that manages authentication
        perform authenticate() {
            //OAuth context
            authContext = new AuthenticationContext(config);

            // Test For & Deal with Redirect From AAD After Login
            var isCallback = authContext.isCallback(window.location.hash);
            if (isCallback) {
                authContext.handleWindowCallback();
            }
            var loginError = authContext.getLoginError();

            if (isCallback && !loginError) {
                window.location = authContext._getItem(authContext.CONSTANTS.STORAGE.LOGIN_REQUEST);
            }
            else {
                errorMessage.textContent = loginError;
            }
            consumer = authContext.getCachedUser();

        }

        //perform that logs within the consumer
        perform login() {
            authContext.login();
        }
        //perform that logs out the consumer
        perform logout() {
            authContext.logOut();
            accountsTable.type.show = "none";
            accountsTableBody.innerHTML = "";
        }

        //perform that initiates retrieval of accounts
        perform getAccounts() {

            getAccountsButton.disabled = true;
            var retrievingAccountsMessage = doc.createElement("p");
            retrievingAccountsMessage.textContent = "Retrieving 10 accounts from " + organizationURI + "/api/information/v9.1/accounts";
            message.appendChild(retrievingAccountsMessage)

            // Perform to carry out operation is handed as a parameter to the acquireToken methodology
            authContext.acquireToken(organizationURI, retrieveAccounts)

        }

        //Perform that really retrieves the accounts
        perform retrieveAccounts(error, token) {
            // Deal with ADAL Errors.
            if (error || !token) {
                errorMessage.textContent = 'ADAL error occurred: ' + error;
                return;
            }

            var req = new XMLHttpRequest()
            req.open("GET", encodeURI(organizationURI + "/api/information/v9.1/accounts?$choose=title,address1_city&$high=10"), true);
            //Set Bearer token
            req.setRequestHeader("Authorization", "Bearer " + token);
            req.setRequestHeader("Settle for", "utility/json");
            req.setRequestHeader("Content material-Sort", "utility/json; charset=utf-8");
            req.setRequestHeader("OData-MaxVersion", "4.0");
            req.setRequestHeader("OData-Model", "4.0");
            req.onreadystatechange = perform () {
                if (this.readyState == 4 /* full */) {
                    req.onreadystatechange = null;
                    if (this.standing == 200) {
                        var accounts = JSON.parse(this.response).worth;
                        renderAccounts(accounts);
                    }
                    else {
                        var error = JSON.parse(this.response).error;
                        console.log(error.message);
                        errorMessage.textContent = error.message;
                    }
                }
            };
            req.ship();
        }
        //Perform that writes account information to the accountsTable
        perform renderAccounts(accounts) {
            accounts.forEach(perform (account) {
                var title = account.title;
                var metropolis = account.address1_city;
                var nameCell = doc.createElement("td");
                nameCell.textContent = title;
                var cityCell = doc.createElement("td");
                cityCell.textContent = metropolis;
                var row = doc.createElement("tr");
                row.appendChild(nameCell);
                row.appendChild(cityCell);
                accountsTableBody.appendChild(row);
            });
            accountsTable.type.show = "block";
        }

    </script>
    <type>
        physique {
            font-family: 'Segoe UI';
        }

        desk {
            border-collapse: collapse;
        }

        td, th {
            border: 1px stable black;
        }

        #errorMessage {
            colour: crimson;
        }

        #message {
            colour: inexperienced;
        }
    </type>
</head>
<physique>
    <button id="login">Login</button>
    <button id="logout" type="show:none;">Logout</button>
    <button id="getAccounts" type="show:none;">Get Accounts</button>
    <div id="errorMessage"></div>
    <div id="message"></div>
    <desk id="accountsTable" type="show:none;">
        <thead><tr><th>Title</th><th>Metropolis</th></tr></thead>
        <tbody id="accountsTableBody"></tbody>
    </desk>
</physique>
</html>
HTML
6. jQuery – To Join Dataverse from Extenal App
use under jQuery code to attach Dataverse from exterior app.
To connect with the Dataverse Net API from an exterior utility utilizing jQuery, you should use jQuery’s AJAX perform to make requests. Under is an instance of how one can authenticate and make a request to the Dataverse Net API utilizing jQuery with Azure AD authentication.
Assuming you’ve registered an utility in Azure Lively Listing and configured the required permissions for accessing Dataverse:
<!DOCTYPE html>
<html>
<head>
    <title>Easy SPA</title>
    <meta charset="utf-8" />
    <script src="https://safe.aadcdn.microsoftonline-p.com/lib/1.0.17/js/adal.min.js"></script>
    <script kind="textual content/javascript">

        "use strict";

        //Set these variables to match your setting
        var organizationURI = "https://devboxsoftchief.api.crm8.dynamics.com"; //The URL of your Frequent Information Service group
        var tenant = "3be0e278-57d8-431f-aefa-459cd7449ebc"; //The title of the Azure AD group you utilize
        var clientId = "8edd889b-2a70-46c0-a161-0e4ce4ee9f2d"; //The ClientId you bought whenever you registered the appliance
        var pageUrl = "https://localhost:44396/Check.html"; //The URL of this web page in your improvement setting when debugging.

        var consumer, authContext, message, errorMessage, loginButton, logoutButton, getAccountsButton, accountsTable, accountsTableBody;

        //Configuration information for AuthenticationContext
        var endpoints = {
            orgUri: organizationURI
        };

        window.config = {
            tenant: tenant,
            clientId: clientId,
            postLogoutRedirectUri: pageUrl,
            endpoints: endpoints,
            cacheLocation: 'localStorage',
        };

        doc.onreadystatechange = perform () {
            if (doc.readyState == "full") {

                //Set DOM parts referenced by scripts
                message = doc.getElementById("message");
                errorMessage = doc.getElementById("errorMessage");
                loginButton = doc.getElementById("login");
                logoutButton = doc.getElementById("logout");
                getAccountsButton = doc.getElementById("getAccounts");
                accountsTable = doc.getElementById("accountsTable");
                accountsTableBody = doc.getElementById("accountsTableBody");

                //Occasion handlers on DOM parts
                loginButton.addEventListener("click on", login);
                logoutButton.addEventListener("click on", logout);
                getAccountsButton.addEventListener("click on", getAccounts);

                //name authentication perform
                authenticate();

                if (consumer) {
                    loginButton.type.show = "none";
                    logoutButton.type.show = "block";
                    getAccountsButton.type.show = "block";

                    var helloMessage = doc.createElement("p");
                    helloMessage.textContent = "Whats up " + consumer.profile.title;
                    message.appendChild(helloMessage)

                }
                else {
                    loginButton.type.show = "block";
                    logoutButton.type.show = "none";
                    getAccountsButton.type.show = "none";
                }

            }
        }

        // Perform that manages authentication
        perform authenticate() {
            //OAuth context
            authContext = new AuthenticationContext(config);

            // Test For & Deal with Redirect From AAD After Login
            var isCallback = authContext.isCallback(window.location.hash);
            if (isCallback) {
                authContext.handleWindowCallback();
            }
            var loginError = authContext.getLoginError();

            if (isCallback && !loginError) {
                window.location = authContext._getItem(authContext.CONSTANTS.STORAGE.LOGIN_REQUEST);
            }
            else {
                errorMessage.textContent = loginError;
            }
            consumer = authContext.getCachedUser();

        }

        //perform that logs within the consumer
        perform login() {
            authContext.login();
        }
        //perform that logs out the consumer
        perform logout() {
            authContext.logOut();
            accountsTable.type.show = "none";
            accountsTableBody.innerHTML = "";
        }

        //perform that initiates retrieval of accounts
        perform getAccounts() {

            getAccountsButton.disabled = true;
            var retrievingAccountsMessage = doc.createElement("p");
            retrievingAccountsMessage.textContent = "Retrieving 10 accounts from " + organizationURI + "/api/information/v9.1/accounts";
            message.appendChild(retrievingAccountsMessage)

            // Perform to carry out operation is handed as a parameter to the acquireToken methodology
            authContext.acquireToken(organizationURI, retrieveAccounts)

        }

        //Perform that really retrieves the accounts
        perform retrieveAccounts(error, token) {
            // Deal with ADAL Errors.
            if (error || !token) {
                errorMessage.textContent = 'ADAL error occurred: ' + error;
                return;
            }

            var req = new XMLHttpRequest()
            req.open("GET", encodeURI(organizationURI + "/api/information/v9.1/accounts?$choose=title,address1_city&$high=10"), true);
            //Set Bearer token
            req.setRequestHeader("Authorization", "Bearer " + token);
            req.setRequestHeader("Settle for", "utility/json");
            req.setRequestHeader("Content material-Sort", "utility/json; charset=utf-8");
            req.setRequestHeader("OData-MaxVersion", "4.0");
            req.setRequestHeader("OData-Model", "4.0");
            req.onreadystatechange = perform () {
                if (this.readyState == 4 /* full */) {
                    req.onreadystatechange = null;
                    if (this.standing == 200) {
                        var accounts = JSON.parse(this.response).worth;
                        renderAccounts(accounts);
                    }
                    else {
                        var error = JSON.parse(this.response).error;
                        console.log(error.message);
                        errorMessage.textContent = error.message;
                    }
                }
            };
            req.ship();
        }
        //Perform that writes account information to the accountsTable
        perform renderAccounts(accounts) {
            accounts.forEach(perform (account) {
                var title = account.title;
                var metropolis = account.address1_city;
                var nameCell = doc.createElement("td");
                nameCell.textContent = title;
                var cityCell = doc.createElement("td");
                cityCell.textContent = metropolis;
                var row = doc.createElement("tr");
                row.appendChild(nameCell);
                row.appendChild(cityCell);
                accountsTableBody.appendChild(row);
            });
            accountsTable.type.show = "block";
        }

    </script>
    <type>
        physique {
            font-family: 'Segoe UI';
        }

        desk {
            border-collapse: collapse;
        }

        td, th {
            border: 1px stable black;
        }

        #errorMessage {
            colour: crimson;
        }

        #message {
            colour: inexperienced;
        }
    </type>
</head>
<physique>
    <button id="login">Login</button>
    <button id="logout" type="show:none;">Logout</button>
    <button id="getAccounts" type="show:none;">Get Accounts</button>
    <div id="errorMessage"></div>
    <div id="message"></div>
    <desk id="accountsTable" type="show:none;">
        <thead><tr><th>Title</th><th>Metropolis</th></tr></thead>
        <tbody id="accountsTableBody"></tbody>
    </desk>
</physique>
</html>
HTML
7. C# – Calling Dataverse from Exterior App
Use under code in C# to name Dataverse Net API from Exterior App.
To name the Dataverse Net API from an exterior utility utilizing C#, you should use the HttpClient class, which is a part of the System.Internet.Http namespace. Under is an instance of how one can authenticate and make a request to the Dataverse Net API utilizing C# with Azure AD authentication.
Assuming you’ve registered an utility in Azure Lively Listing and configured the required permissions for accessing Dataverse:
utilizing System;
utilizing System.Internet.Http;
utilizing System.Textual content;
utilizing System.Threading.Duties;

class Program
{
    static async Job Predominant(string[] args)
    {
        string tenantId = "your-tenant-id";
        string clientId = "your-client-id";
        string clientSecret = "your-client-secret";
        string useful resource = "https://your-dataverse-url.api.crm.dynamics.com"; // The Dataverse Net API endpoint

        // Receive an entry token utilizing shopper credentials
        string accessToken = await GetAccessToken(tenantId, clientId, clientSecret, useful resource);

        if (!string.IsNullOrEmpty(accessToken))
        {
            // Make a request to the Dataverse Net API
            await MakeDataverseRequest(accessToken);
        }
        else
        {
            Console.WriteLine("Did not get hold of entry token.");
        }
    }

    static async Job<string> GetAccessToken(string tenantId, string clientId, string clientSecret, string useful resource)
    {
        string tokenEndpoint = $"https://login.microsoftonline.com/{tenantId}/oauth2/token";
        string requestBody = $"grant_type=client_credentials&client_id={Uri.EscapeDataString(clientId)}&client_secret={Uri.EscapeDataString(clientSecret)}&useful resource={Uri.EscapeDataString(useful resource)}";

        utilizing (HttpClient shopper = new HttpClient())
        {
            HttpResponseMessage response = await shopper.PostAsync(tokenEndpoint, new StringContent(requestBody, Encoding.UTF8, "utility/x-www-form-urlencoded"));

            if (response.IsSuccessStatusCode)
            {
                string responseContent = await response.Content material.ReadAsStringAsync();
                dynamic json = Newtonsoft.Json.JsonConvert.DeserializeObject(responseContent);
                return json.access_token;
            }
            else
            {
                Console.WriteLine($"Did not get hold of entry token: {response.ReasonPhrase}");
                return null;
            }
        }
    }

    static async Job MakeDataverseRequest(string accessToken)
    {
        string apiUrl = "https://your-dataverse-url.api.crm.dynamics.com/api/information/v9.1/"; // Regulate the API model as essential

        utilizing (HttpClient shopper = new HttpClient())
        {
            shopper.DefaultRequestHeaders.Authorization = new System.Internet.Http.Headers.AuthenticationHeaderValue("Bearer", accessToken);

            HttpResponseMessage response = await shopper.GetAsync(apiUrl + "accounts");

            if (response.IsSuccessStatusCode)
            {
                string responseContent = await response.Content material.ReadAsStringAsync();
                Console.WriteLine("Dataverse Information: " + responseContent);
            }
            else
            {
                Console.WriteLine($"Did not fetch information: {response.ReasonPhrase}");
            }
        }
    }
}
C#
Azure Perform Pattern Code with Dataverse
utilizing System;
utilizing System.Linq;
utilizing System.Internet;
utilizing System.Internet.Http;
utilizing System.ServiceModel.Description;
utilizing System.Threading.Duties;
utilizing Microsoft.Azure.WebJobs;
utilizing Microsoft.Azure.WebJobs.Extensions.Http;
utilizing Microsoft.Azure.WebJobs.Host;
utilizing Microsoft.Crm.Sdk.Messages;
utilizing Microsoft.Xrm.Sdk;
utilizing Microsoft.Xrm.Sdk.Shopper;

namespace CRM.AzureFunction.Integration {
  public static class Function1 {
    [FunctionName("Function1")]
    public static Job RunAsync([HttpTrigger(AuthorizationLevel.Anonymous, "POST", Route = null)] HttpRequestMessage req, TraceWriter log) {

      log.Data("C# HTTP set off perform processed a request.");
      IOrganizationService service = null;

      #area Credentials Code If MFA is enabled
      //Credentials
      string URL = "Dynamics CRM URL";
      string ClientID = "Azure App Register ClientID";
      string ClientSecret = "Azure App Register Shopper Secret";
      string AuthType = "ClientSecret" ;
      //if you're utilizing App password then add AuthType=Office365
      #endregion

      #area Credentials Code If MFA just isn't enabled
      //Credentials
      string URL = "Dynamics CRM URL";
      string userName = "userName";
      string password = "passWord";
      string AuthType ="OAuth" ;
      //if you're utilizing App password then add AuthType=Office365
      #endregion

      strive {

        string conn = $ @ "Url = {URL};AuthType = {AuthType};UserName = {userName};Password = {password};AppId = 51f81489-12ee-4a9e-aaae-a2591f45987d;RedirectUri = app://58145B91-0C36-4500-8554-080854F2AC97;LoginPrompt=Auto;RequireNewInstance = True";

        ///Under connection string is for MFA Enabled which ultized the ClientID and CLientSecret
        string conn = $@" AuthType={AuthType};url={URL};ClientId={ClientID};ClientSecret={ClientSecret}";

        var svc = new CrmServiceClient(conn);
        service = svc.OrganizationWebProxyClient != null ? svc.OrganizationWebProxyClient : (IOrganizationService) svc.OrganizationServiceProxy;

        if (service != null) {
          Guid userid = ((WhoAmIResponse) service.Execute(new WhoAmIRequest())).UserId;

          if (userid != Guid.Empty) {
            log.Data("Connection Established Efficiently...");
          }
        } else {
          log.Data("Did not Established Connection!!!");
        }
      } catch (Exception ex) {
        log.Data("Exception caught - " + ex.Message);
      }

      return Job.CompletedTask;
    }
  }
}
C#
Hope this helps

You’ll be able to enroll now !We’re giving 30% low cost on our Internship Program
Don’t miss the prospect to take part within the upcoming Internship Program which will probably be completed utilizing Microsoft Dot Internet Net Growth Full Stack Expertise. The brand new batch will probably be ranging from Could 20, 2024. We can have most skilled trainers so that you can efficiently full the internship with reside mission expertise.
Why to decide on Our Internship Program?
Trade-Related Tasks
Tailor-made Assignments: We provide tasks that align along with your tutorial background and profession aspirations.
Actual-World Challenges: Deal with industry-specific issues and contribute to significant tasks that make a distinction.
Skilled Mentorship
Steering from Consultants: Profit from one-on-one mentorship from seasoned professionals in your discipline.
Profession Growth Workshops: Take part in workshops that concentrate on resume constructing, interview expertise, and profession planning.
Networking Alternatives
Join with Trade Leaders: Construct relationships with professionals and increase your skilled community.
Peer Interplay: Collaborate with fellow interns and change concepts, fostering a supportive and collaborative setting.
Talent Enhancement
Fingers-On Expertise: Acquire sensible expertise and be taught new applied sciences by means of project-based studying.
Tender Abilities Growth: Improve communication, teamwork, and problem-solving expertise important for profession success.
Free Demo Class Obtainable


+ There are no comments
Add yours